Understanding the Importance of a Proper Camera Mount
Grasping the Significance of a Well-Mounted Ring Doorbell
When it comes to ensuring the seamless operation of your Ring Doorbell, the camera mount plays a crucial role. A well-installed camera mount enhances the functionality of your doorbell, providing clearer views and enhanced security. With numerous mounting options available, choosing the right one can significantly enhance your device's performance.
A carefully selected mount adapts to your doorbell’s features, be it a ceiling mount or a wall mount. The correct mount will align the camera correctly, offering a clear field of view and ensuring that the camera's performance is optimized. It can also affect the overall aesthetics by complementing the exterior of your house, giving it either a subtle or standout look.
Beyond aesthetics, the right camera mount also supports the safety and security aspect of your doorbell. A secure mount prevents tampering and ensures the camera stays in place regardless of weather conditions or attempts at physical interference.
From articulating arms to wall mounts, exploring detailed options will help you understand which mount systems are available for your setup. Some mounts like the ball head or the magic arm allow flexibility, while a pole mount or a clamp mount offers a customizable height and angle for your camera.
Understanding the details of each mount option and investing in a robust mounting system results in optimal camera performance, and ensures your Ring Doorbell is a reliable security tool.
Types of Camera Mounts Available for Ring Doorbells
Exploring Various Camera Mount Options for Your Ring Doorbell
When enhancing the security and functionality of your Ring Doorbell, selecting the right camera mount is crucial. With a variety of mounting options available, you can find solutions tailored to your specific needs, accommodating any type of surface or viewing angle.
Wall and Ceiling Mounts
One of the most common choices is the camera wall mount, which provides a sturdy and straightforward solution for attaching your camera to the wall. The standard camera mount is ideal for easy positioning. If you prefer a different angle, consider a ceiling mount, allowing for higher or downward-facing views, perfect for monitoring larger areas.
Articulating and Magic Arms
For more flexibility, articulating arms and the magic arm can be great options. These allow you to adjust the camera's position easily, providing a versatile angle adjustment feature at a reasonable current price. Incorporating a ball head into these configurations ensures smooth rotational capabilities.
Pendant and Pole Mounts
If you need to place your doorbell in unique locations, a pendant mount or pole mount can provide the solution. This mounting system can be attached to existing poles or pendant fixtures, offering a creative yet secure method of securing your ring cameras.
Clamps and Adapter Systems
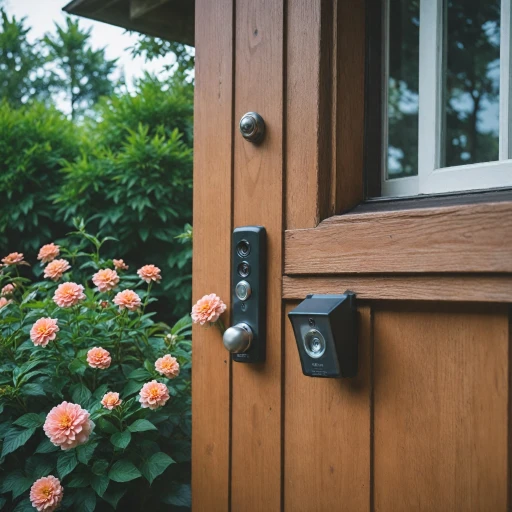
For those unwilling to drill into walls, the clamp mount provides an efficient alternative. It's easily adjustable and ensures a secure hold. Discover more about the versatility of Ring clamps for even greater adaptability in positioning. Furthermore, mount adaptors can help seamlessly integrate your device into a pre-existing tripod mount or setup.
Each camera mounting option has its unique price and benefits, allowing you to customize to your specific security needs and environmental conditions. By considering placement, you'll equip your Ring doorbell with the best view and functionality possible.
Choosing the Right Location for Your Camera Mount
Picking the Perfect Spot for Your Ring Doorbell Camera
When it comes to optimizing the security of your property, selecting the right location for your camera mount is crucial. This decision impacts the field of view and the camera’s ability to capture essential footage. Various factors come into play, such as accessibility, potential viewing angles, and exposure to the elements.
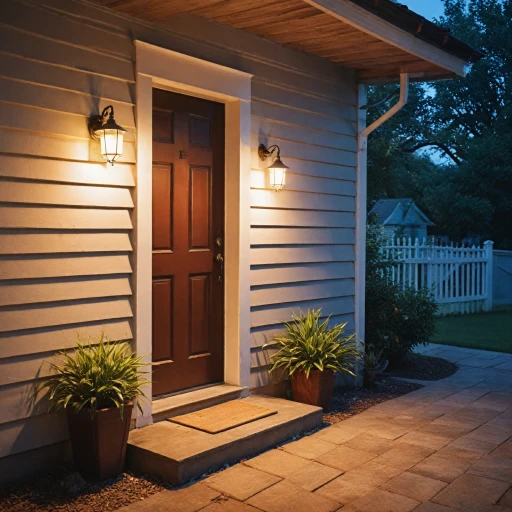
First, consider the height of your installation. Mounting the camera at an appropriate height can significantly enhance its effectiveness. Typically, placing the camera at least 7-9 feet off the ground offers a good balance between capturing facial features and avoiding tampering. Too high, and you might miss important details; too low, and you might compromise the camera's safety.
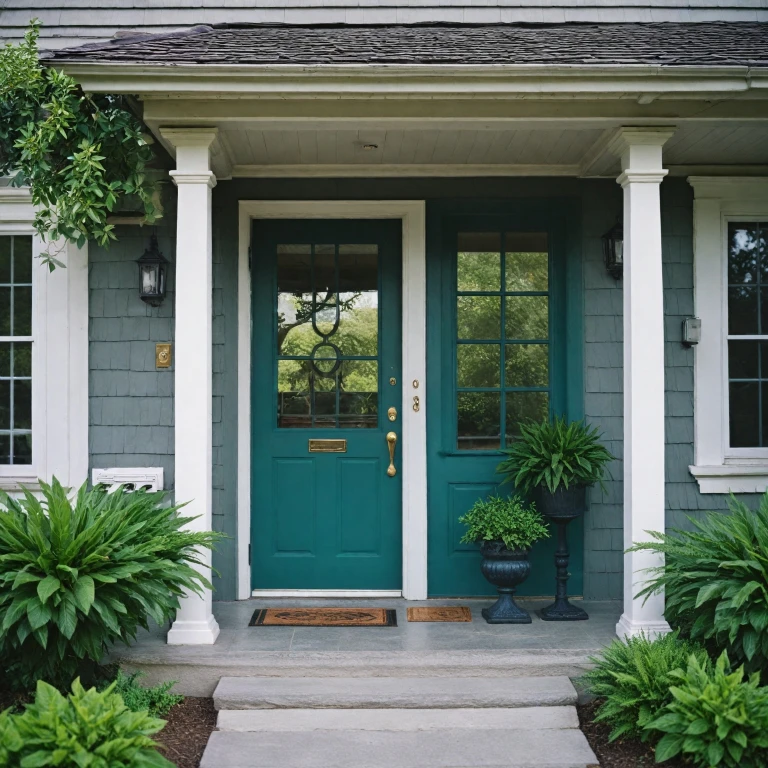
Next, think about the mounting options that best fit your home exterior. There are several mounts to choose from, such as wall mount brackets, clamp mounts, or even pole mounts. Wall mounts, available in various colors like white to blend with your exterior, are a practical choice, providing a stable platform for your device.
Additionally, if you're dealing with an irregular surface or require an extended reach, an articulating arm or magic arm mount can offer the flexibility needed. These mounts allow you to adjust the positioning back and forth or side to side, ensuring a perfect view.
When assessing different mounting points, consider using a ball camera mount, which is particularly useful for angled views. The ball head allows for multidirectional adjustments, making it easier to achieve the ideal orientation without needing additional equipment.
Finally, for installations beneath eaves or ceilings, a ceiling mount or pendant mount might be more suitable, providing covert yet effective coverage.
Remember, each location may have its pros and cons concerning viewing angle, mounting complexity, and exposure. Therefore, it’s worth evaluating all potential sites and mounting systems to make an informed decision that suits your specific needs and budget. A well-considered camera mounting plan is crucial to fully leverage the capabilities of your Ring doorbell.
Step-by-Step Guide to Installing a Camera Mount
Install Your Ring Mount with These Simple Steps
Installing a camera mount for your Ring doorbell is a straightforward process, provided you follow the right steps and have all necessary components at hand. Here’s a step-by-step guide to get your Ring device up and running with a secure camera mounting.- Gather Your Tools: Before you begin, ensure you have the appropriate tools: screwdriver, drill, screws, and any specific adapters or clamps required for your mount system. A ball head or articulating arm can make adjustments easier.
- Select the Mounting Location: Double-check where you wish to install your doorbell for optimal coverage. Consider factors like exposure to weather and potential obstructions that could hinder your camera’s view.
- Position the Bracket: Hold the camera wall bracket or pole mount against the desired spot. Use a pen or pencil to mark where the screws will be placed on the wall or ceiling.
- Drill Holes for the Screws: Carefully drill into the marked spots, ensuring the holes align perfectly for a secure fit. Using the wrong drill bit size could damage the wall or cause a loose fit, so take care.
- Secure the Mounting Bracket: With the holes ready, attach the bracket or pendant mount by screwing it into place. Make sure it is tightly secured to bear the weight of the camera. A ceiling mount or wall mount should hold firm under regular price forces.
- Attach Your Ring Device: Follow the product’s instructions to affix the camera or standard mount adaptor to the newly installed bracket. A clamp mount or magic arm can offer additional adjustments to fine-tune the camera’s angle and view.
- Test Your Setup: Once mounted, check the camera’s alignment to make sure it is set for optimal surveillance. Adjust as necessary using the ball camera or arm, if needed.
Troubleshooting Common Camera Mount Issues
Troubleshoot Mounting Issues Effectively
Mounting your Ring doorbell camera properly is crucial for ensuring seamless functionality, but occasionally, you might encounter some common mounting issues. Here's how to address them effectively:- Alignment Problems: If your camera's view is obstructed or not capturing the desired area, consider adjusting the ball head or using an articulating arm to refine its positioning. An articulating arm can help you pivot the camera for optimal coverage without altering the mount extensively.
- Insecure Mounting: Over time, mounts might loosen, especially with frequent camera adjustments. Ensure that all screws, whether on a wall, ceiling, or a pole mount, are tightened. A camera mounting system with a reliable ball camera or tripod mount can provide a sturdier hold.
- Compatibility Issues: Not all mounts are designed for all camera types. Check if you're using the correct mount adapter or wall mount bracket that suits the specific model of your camera. This includes verifying whether a ceiling or pole mount fits well with the camera's mounting requirements.
- Weather-Related Concerns: Outdoor mounts may face additional challenges such as moisture or temperature variations. Choosing a camera mount system that includes weatherproof features or using a white bracket to match and protect the exterior can help mitigate these issues.